Outlook 2007 Errors: 0x8004010D and 0x80004005

Well this is a reminder about those two errors that appear in Outlook.

The error 0x80004005

This is one tricky  b@astard message, it really doesn't tell you whats going on. This error appeared to me when I tried to receive new emails in Outlook 2007. For what I have discovered, it just tell you that you can receive new mails. It may appear if you .pst files weights more than 4Gb and youre using Windows XP, or maybe there's an Antivirus blocking the entry of new mails.

The error 0x8004010D

This one is easy, its about your .pst file. As I told you before, thers a limit of space of 2Gb or 4Gb, after that the file cannot grow more. This will happen if youre still using Windows XP or use a FAT hard drive instead of NTSF.

Solutions?

Well, I dont really know what to do, but you can check this tool to change the size of the PST file and split it in more parts. Hope this help anyone.

More Links:


How to Fix the Socket Exception in Wamp2.2 and Netbeans

So I have this setup going on:

  • Windows 8 64bits
  • Wamp 2.2
  • PHP 5.4.3
  • Apache 2.4.4
  • And by default Xdebug  2.2.0-5.4-vc9
  • Netbeans 7.2 

The normal setup that comes with the new WAMP 2.2. When I was trying to debug a simple drupal project I got the tipical please  configure you php.ini according to this:

[xdebug]
xdebug.remote_enable = on
xdebug.remote_handler = dbgp
xdebug.remote_host = localhost
xdebug.remove_port = 9000

Nice, so I set up my PHP.INI  with the info above and start debuging again and BAM: Socket Exception on NetBeans with some instruction to disable watches. Thats the usuall stuff that netbeans tells when xdebug is not well configured.  So heres comes the solution:

Want to easily open up php.ini? Just leftclick your wampserver icon and navigate to it


THE MIGHTY SOLUTION:

1) Download the latest release of xdebug. Now you got to be very carefully chosing the adecuate file. In my case I downloaded : PHP 5.4 VC9 TS (64 bit).

Now, How do you choose the one?. Easy. The first part of the name is the version of PHP you use, so I have to choose those that start with PHP 5.4. Then comes the version of Visual Studio that this .dll has been compiled. Usually you got to choose the same one has your PHP and Apache have been compiled and for Wamp2.2 it is VC9. Now what about TS? TS means Thread Safe and for what I know is the one thats work well with newest apaches and phps. I downloaded another version (this one: PHP 5.4 VC9 (64 bit) , notice it doesnt say TS) that wasn't threat safe and I got the Netbeans message that It couldn't connect to the port.... so make sure is TS using my configuration above. Now dont forget the 64 bits part or 32bits part, its depend of the version of WAMP youre using.

2) Find this chain in your PHP.ini : zend_extension, comment it and add this one zend_extension = "c:/wamp/bin\php/php5.4.3/zend_ext/php_xdebug-2.2.3-5.4-vc9-x86_64.dll". And yes move your dowloaded xdebug to that address. And restart. 


 This is what's will look like your php.ini after the changes. Usually the xdebug info is at the bottom of your php.ini

3) Woalla, now youre debugging =).

Fixing Wamp and Undefined function pg_connect() in Windows7

So this is an update to my post on Fixing Wamp not so friendly extension.
I was trying to configure WAMP in WIndows7 so I can play with postgres 8.4. So I put on the extension php_pgsql and php_pdo_pgsql and it doest work.

To fix this you must find the libpq.dll file in C:\wamp\bin\php\php5.X.X whatever your version is) and put it on C:\Windows\System32 AND  to c:/wamp/bin/apache/apachex.x/bin (this is the difference with my post) .


 Please note that just in case you must install a WAMP of the same bitage that your postgres version. In my case Wamp 64 bits didnt work on my Postgres of 32 bits, so i reinstalled and used the Wamp of 32bit.

Hope it help anyone!

Easy Way to install PEAR and PHPUnit in WAMP 2.2 with Windows 7

Quite a big title but i found an easy way to install PEAR and PHPUnit in WAMP. I am really new about doing this but seems that it install them correctly. So here we go.

Preamble

Well make sure you have installed WAMP server on your PC. Its quite straightforward to install it so we are not making any special instruction to do it. Just download the installer, double click and select the browser you will want WAMP to use as default

Installing PEAR

  • First download the PEAR .phar file and put it in c/wamp/bin/php/php5.3.8. 
  • Now search for the windows console and open it up as an administrator. Take a look at the picture to give you an idea:
Searching for CMD and using it as an administrator
  • Now in CMD write this: cd C:\wamp\bin\php\php5.3.8 
  • After that write this: php gp-pear.phar
  • It will ask "Are you installing a system-wide PEAR or a local copy? write system and shot enter
  • It will output crazy stuff like temporary directory and so, wait until it ask 1-12, 'all' or Enter to Continue, just press enter
  • Then it will ask If the specified directory is also not in the include_path.... write Y
  • Then it will end. Now as strange as it sound, install it again writing php gp-pear.phar and do the same stuff all over again. Why you may ask, well there's an error that comes the first time you install PEAR, so doing it again solve that error. So do it again :)
  • Now after it finished installing open this file with notepad C:\wamp\bin\php\php5.3.8\php.ini and search for the line ;include_path = ".;c:\php\includes", after this line write this  include_path = ".;C:\wamp\bin\php\php5.3.8\pear"   It will look like this:


  • Nice!, now do the same for this other php.ini file: C:\wamp\bin\apache\Apache2.2.21\bin\php.ini, open it up search for ;include_path = ".;c:\php\includes" and after that line write  include_path = ".;C:\wamp\bin\php\php5.3.8\pear"
  • Excellent, now reset your WAMP making left-click on his icon an pressing the button Restart all Services:


  • Congrats yourself, you just installed PEAR on Windows. Now lets test it. On your CMD, make sure youre on c:\wamp\bin\php\php5.3.8 and write pear. You should see appear a list of commands from pear. 
  • Now to call pear from the command line from anywhere, not only the pear directory we must install it on the path variable of windows. Go to your control panel  and in the search toolbox write variable

  • There will be an option called edit the system variables. Use the one with the Shield. Click that option and it should appear something like this: 

  • Select the Path Variable and click on Edit, and put this (yes including the semicolon) ;C:\wamp\bin\php\php5.3.8


  • Nice, one more thing that may help. In C:\wamp\bin\php\php5.3.8 theres a file called PEAR_ENV.reg. Execute it. It will put some new variables on your PATH. I guess there are very important. But please comment if you know something about it.


Installing PHPUnit


  • This is easier that PEAR. First open your CMD and write pear upgrade pear
  • Once pear is updated, write one at a time and press enter for each line:
    •  pear channel-discover components.ez.no 
    •  pear channel-discover pear.phpunit.de
    •  pear channel-discover pear.symfony-project.com
  • After that write this: pear install --alldeps phpunit/PHPUnit
Excellent PHPUnit and PEAR are installed on your WAMP. If you want to thank me please first thanks this dudes, they write this down first. I only put some more images here : 

Drupal Views & image Title & Tooltips


Well, its time for some new and nice Drupal Tutorial. Today we are looking for the abilitiy to create easy Tooltips in Drupal 6 using Views. ( Will work on Drupal 7 with almost no change ). And we are putting those nice and crispy tooltips with any content that we want.  It will appear  mouseovering on a Image.

Online Example at: www.reich.com.pe/pedidos

The Recipe

For this Example we  are going to need this 3 modules installed on your drupal site :

Of course feel free to install any module you need to improve the view (like imagecache module).


How to Do It 

1) Ok, first create a view and put all the fields and filters and well, anything you want on your views excepting of course the image we want to be tooltiped.

In this case we are adding only the Title field. Lets keep it simple.

2) Now Add the field that is going to contain the tooltip info and exclude it from display.

In this case, the node body is our chosen one. Dont forget to exclude it from display

3) Next, add the field were we want the tooltip to appear, and do the following ministeps:
  •  check the "Rewrite the output of this field". A textbox should appear
  • Wrap your field (in this case [field_image_cache_fid])  in a div.
  • Put a class called tip (or whatever word you choose) on the div.
  • Put a title equal to the field on step 2.


 Do you notice the words between brackets [ ]?. Those are  replacement patterns words that essentially are all the fields that you put before the actual field youre editing. You can see a list of all the active replacement patters after the "Rewrite the output of this field" Textbox. It looks like this:

If you dont a field there, then 90% of the cases are that you added the field AFTER the field yoyre rewriting.


4) Save your view and go to the folliowing address: yoursite.com/admin/settings/tipsy. Now this is the Tipsy configuration page. In tipsy you can do two things. Configure the tooltips on all your Drupal forms (have fun) and create Custom Selectors to indicate where we want the tips to show up.

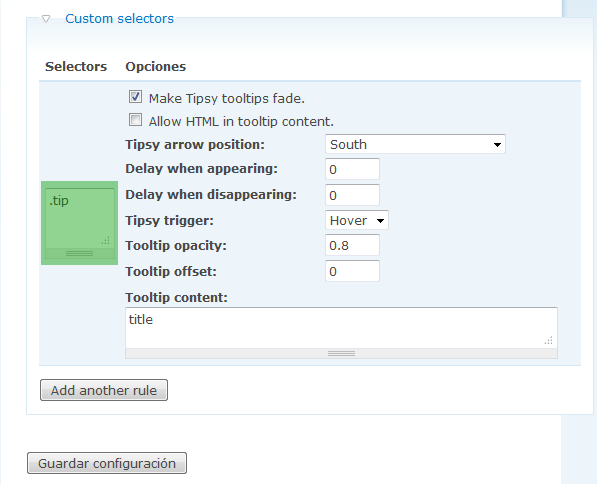
Create a Custom Selector like this:


In the Green Square we are going to put just ONE selector. Remember that we wrap a field inside a div and put a .tip class on the div?. Here we tell tipsy what page element should be Tipsied. Yes tipsied... I cant find any other word to describe that.

Save the configuration and enjoy!. Dont forget to clean caches just in case. Comments?

Relative Superfish is a Mad Mad Girl

When trying to use Superfish or other css-based dynamic menu, Internet Explorer will complot against you, specially with some complex layout.

Lets take an example of what im saying. Suppose we want to do come to this:

This is a typical web page, we have a Menu with Superfish, an Slideshow underneat it, and also a floating Logo. So what is the best way to put all of this?

1) Lets make the Dom:
Thats right, put the container divs in that order and together at the same DOM level. Those ID comes from Drupal, but you can name them as you want.

2) Position:
This is almost easy, just put them as the image suggest:

The important part here is the static position on the Superfish Menu. Never put a position:relative to the superfish menu container. It will just mess it up the children menus. Why it does that? Well for what I know, when a relative item (the submenu) is inside another relative item (the container), that item will only appear inside the view area of the container. Of course only on IE. (6 to 8 at least).

The Dreaded INVALID_STATE_ERR: DOM Exception 11

Last month I had a strange problem in Chrome with Jquery, the chrome console launched me an INVALID_STATE_ERR:DOM 11 error. It happen when i tried to insert a string of HTML directly using $.html(). Other browsers didnt thrown any error,even IE where ok with that kind of indecent proposal i tried to reach.

So what was the problem with Mr Chrome?
The Exception 11 means teorically means that some objects doesnt exist, in practice it mean that you're creating DOM objects ( I means html tags) using jquery append(), html() or prepend() with semantics errors, like not closing the tags or something like that. So if you write bad html like $.html('<ul><li>HelloWorld</li></ul>'); , ( we did'nt close the li tag) there will be mayhem in Chrome.

And the solution?