Drupal: From localhost to your domainsite in five steps


The designer in you, has finished to create the plus ultra of web pages, the only problem is that your web pages is in localhost, or worse yet, it is in a subdirectory in another domain. No problem, with this five step guide step you are going to have our web page ready to be truly Online

Step 1
Backup your database and webpage and put it in your new domain. This mean you have to enter your cpanel ( or other web manager , if you have plesk, may Odin be with you) and go to PhpMyAdmin ( you can install it if you dont have one, its free!) and export your database.

Now import it to your new domain. There may be a problem while importing the backup to your new site, If your database backup file is more than 5 mb, then you probably need BigDump. Its an Ajax uploader of databases. So when exporting your sql, mak sure to uncheck the Extended Insert option, it juss mess up BigDump.

In BigDump, make sure to use UTF-8 (or the schema youre using) in his config, this will make you very happy latter.

Exporting your database so bigdump can use it

Step2: Domain URL
So far so good, you need to modify the sites/default/settings.php
. Change the new database access, and the base_url variable (read the instructions there, nothing fancy really). Make sure that you have the right permission of modifyng that file. Usually it will not come with write permission (or chmod 555) . Make it chmod 777 (change is permission to write) and start modifyng. Then change it back to 555 for security sake.

Step3: htaccess
Did you change the permission for settings.php back to 555? Good, then there's a hidden file called .htaccess (notice the dot at the start) that you may need to modifyng. Search for this string # RewriteBase / and remove that # , so it is umcommented. If for some reason you are still at an subdomain you may need to chage it to # RewriteBase /subdomainname

Step 4: Refresh Cache
Now you need to go to http://www.yournewdomainname.com/oldsubdirectory/admin_menu/flush-cache?destination=admin%2Fsettings%2Fsite-information. Notice the red part is your old subdomain. Maybe you will need to remove it, remember that is the name of your old subdirectory (if you used one).

Ste 5: Run Cron
Now go to http://www..yournewdomainname.com/oldsubdirectory/admin/reports/status/run-cron?destination=admin%2Fsettings%2Fsite-information and enter. You are going to run cron. Again maybe you are not going to need that oldsubdirectory part but, just in case it is there.

Then enjoy, Happy New Year from Jeeba!


Yes Please, hack me

So I was doing my usual web surfing, when i managed to run a "secure website". It amazingly scan my PC for troyans and stuff like that. The most beatiful part is when it says that Windows Defender has detected Spyware on my machine.

Windows Defender on my Ubuntu 10.04, using Opera 10. Feeling the sarcasm already?

Its me or PHP is being Javanized?

I dont really like Java, not the languague per se, only her "WEB" stuff, as a PHP developer, PHP has tought me the easy way to create web application. Dont get me wrong, I started programming in Assembler ( i kinda like it, it just make sense!), C, and then C++ with my structures and pointers and memallocs. I started developing enterprice code in JAVA, back then like 8 years ago, i used to do my interfaces in SWT and Swing, yes Desktop Applications. Then one day i decided to learn PHP, like a hobby, I learn it in 8 hours all the necesary stuff including configuring a basic WAMP server. It is so easy!.

¿What about now?
Eight years ahead, my company decided to make a Web application in Java. Damm its so complex, and not in a good way. I mean, all that complexity is just innecesary, but its like fellow Java Developers cant see that complexitiy because they have been brain washed, yes ORM, yes XML for configuring this or that, centralize those files? ha you must be kidding say one of my coworkers, they think its natural to work that hard to spit a checkbox and a commandButton together, something that even when not using a framework its a piece of cake, what a echo can do in a second, i need like 4 classes, one compiler and 3 minutes restarting my server.

The promised futured aeons
And believe me, that complexity, it just keep growing and growing. I heard the reason for this maddness its it just to keep the promise that the maintenance phase of the application in his lifecycle will be easy. How can it be possible?, It just dont make sense!, how putting more complexity in a system is going to make it easier to maintain? What Java Developers needs to comprehend is that LESS IS MORE!, why cant they comprehend this. Maybe its isn't all their fault, after all, Oracle make a lot of investment so you can believe that their products are the best of the best, your boss eat all that cheesse without asking for a different flavor, you must then pay the consequences of a social design pattern, that i call affecionately, the oracle oriented lobbyming.

So PHP is being Javanized, you say
What Drupal taught me is that you dont really need to be crazy about objects , its not the only way to be!.

But after googling identity maps for PHP on google, i just know that we as PHP developers, are being invaded by the Java Way of Live. All the examples for doing identity maps, are just a biased copy of Java. Separating identity maps from data mappers, and creating a ton of more classes just so it can be like the way its implemented normaly in Java. Why cant it be all in just a single class, after all im using the two of them together all the time.

But you can create a Facade Object and unite the two of them, a Java Saviour will say. Nooo hell no, I protest, just mix it all in the same class, make private functions, if you need, and create functions that call those functions that are called togetehr. After all you make a ton of futil getters and setter function, why not put some really useful functions inside it. STOP copying concepts at litteram, and make use of some creativity. Creativity will kill abstraction some day.

Singleton are Evil and other WTF
For example read this article, singletons are evil, they really are making a storm in a glass of water, they can't test a database access singleton, so they want me to use dependancy injection to "solve that problem"? Yes lets put more maneur on the problem, never mind all the instantiation I made before in my code, i will just refactor the hell out of it so i can put a new parameter on the constructor, for real.

They are so blind with their dogmas, they cant see the real problem lays in another realm. Singletons are useful and not using it just because it cant past an unit test, its insanely crazy, we are not programming to pass the unit test, unit test are not out master but our tools.

Maybe its time to change the way I test my singleton i already gave an alternative on the comments), or dont test it at all, its a singleton for god sake!. We tend to forgot that the goal is creating interesting and maintenable software, not appliyng every concept that they sell us, so our software have that "enterprise quality" that will make our brainwashed souls fell safe.

And so it is
And this is only the tip the iceberg, i know PHP is not the best, I am learning Python,just to know his wonders, but i will never freely choose program in Java again for a Web Project.

Just believe my words, in five years "enterprise" will be a pun for complex, boring and , spaguetti like programming, we just started with Struts, now.. Java?

Unite to the Game Development Group!

How you doing my fellow programmers and designers, i invite you to the newly created Game Development group. Its all about of Game Development (in spanish), in every platform imagined. We will try to be a common nexus between spanish speaking developers around the world. Currently Topics of the group are: show us your project, ideas for a game, questions and answers of the community, and of course all new ideas for topics are welcome and encouraged.

Now go Ahead an suscribe to the group, you know you want it ;)

Grupos de Google
Email:

JavaServer Faces Newbie NavigateError


So Im learning JavaServer Faces using netbeans 6.9, Tomcat 6.0 and Java 1.6.0_22; HotSpot(TM) 64-Bit Server VM 17.1-b03 (whatever it is) and i get caught with lots of errors, I kinda like PHP more than Java but work is work.

The Problem
Studying the navigation in Server Faces (you know the XML tags in faces-config.xml) i was having some troubles with a h:commandButton . After clicking that dammed supersubmit button that jsf kindly created for me (hate, hate,
hate those extra markup lines that JSF created automagically , what in god sake is type="text" value="Hola" name="helloForm:j_id_jsp_1546894878_4" suppose to mean?, is like developers where against designers, well i just want to kill some .. ARGGHHH, ok lets continue...)

Well after clicking that stupid submit button, it just doesn't take me to nowhere, and adding more insult to the injury, the widows seems to being charging. Well lets see what tomcat Log have to say:

Yup, nonsense glibberish in bloddy programmer red, an this is like 1% of the total log

From a noobbie point of view, this output scares me to death. I wasnt suppose to "disrespect" JSF at all, but How in earth Im supposse to know what is the error that makes all that messed up crash log get sooo large!?

The Answer
A bloody backslash, yes a boddy backslash like in /welcomeJSF.jsp. It was ahrd for the framework developer to tell me that the address was at least bad formated? And the tutorials didnt say a word about this. geshh . In puting this so it can help another newbie killing himself with jsf. God have mercy on us (and i dont believe in god, for JSF sake)

Quick tips on Drupal hook user


So as you see, Im playing a lot with the hook_user function in Drupal. It has a lot of power, but unfortunately,theres not too much documentation to play with itl. I am going to post some random tips that i learn using the hook user function so this will be an article that would be updated frequently. The tips are for the Drupal 6.X version. Lets begin!

About the hook user function
This is an useful hook function when you need to play around with the users in Drupal, particulary registering users, updating users, validating the info of user and the deletion of user. This function receive four parameters:
  • $op: The operation to perform. Refer to the api to know all the variables
  • &$edit: The values returned from the login/register form. This is a reference to the variable, so be carufull changing values here
  • &$account: The user object on which the operation is being performed. This variable is not always the current active user!, so the global $user is not always equals to $account. For example if you are the superuser and you are registering manually a user called Michael, the $account should be Michael and $user should be the superuser
  • $category The active category of user information being edited. This works only for updating user info.

Tip A: The account variable in $op = validate
I have some problems with this. I was trying to access the name of the account like this $account->name, but it gave me an error saying that the object dont have that field.

When debbuging the variable, I could see the field name with the corresponding value.So what was the problem? Well it appears than when validating the form, the $account variable is an stdClass object, and with those object you cant use the -> operator, you can only access their fields using a sintaxis like associative arrays, so the correct sintaxis in this case is $account['name'] instead of $account->name. Have some fun with this

Tip B: Help, i cant debug hook_user using Drupal for Firebug, or drupal_set_message

The thing with hook_user and many hook in Drupal is that they are called over and over again across different pages.

Drupal for Firebug works putting some hidden html to your footer, so if you try to use it , it will not work. I dont know exactly why this happen but, for example, using firep in the validate $op just wont work.

drupal_set_message is an useful function to send messages to your current Drupal user. But I couldnt make it show a print_r($account) or a var_dump($account), for some strange reason , it just dont work.

The best way to debug your code , appart from using xcode, or Zend debugger, or other professional debug tools, is using the firephp extesion of Firefox. Theres a magic option called persist that save every data ouptputed to firephp, until you delete it manually.


The only problem with firephp is that you have to somehow, integrate it with Drupal. Its not so hard and this useful article will help you install it in a generic PHP program. But remember my word, that Persist Button IS your only friend in Drupal debugging, forget devel or Drupal for firebug module, they just dont have the power!

UPDATE 21 September 2010: Actually Drupal for firebug is an awesome module. After writing this article, as some sort of poetic justice, Firephp started to fail, an in exchange, Drupal for Firebug started to work!. So, i would recommend to use both, just in case, first plug-in Drupal for Firebug, and if it fails then launch Firephp and catch your bug.

Also the devel module as some nice functions for development. And lets not forget the dblog module (formally watchdog, you can found him here admin/reports/dblog). If you see some blank pages maybe going here can help you solve your problems.

Nobody says that being an PyroEntomologist was fun.

Redirect user after login in Drupal

Redirecting users in Drupal is not easy as it seems to be. In this 6.19 version of Drupal, there are some gotchas to have in mind to make a succesfull redirection

The Direct Path : Hooking form_alter
Like the title say, what we need to do is create a hook for the form_alter hook. This hook is usefull for modifyng the form before rendering it (and for a lot of other interesting stuff), and because Mr. login block and Ms. login page (sitemap.com/user) are also forms, we are going to have fun with the hook(er) (bazinga? well, thats a sick joke). Here are the steps for ultimate redirection control:
  1. Create a module: Create two files yeah.info and yeah.module (change yeah for whatever you wish but make sure to remember that key word) and put them inside sites/all/modules/yeah.
  2. Fill yeah.info with this generic code:
    ;
    $Id$
    name = Yeah Redirect
    description = "Redirect your users at login"
    core = 6.x
    package = "Yeah"

    This is just a required file the module need to exist.

  3. Fill yeah.module with this code

    function yeah_form_alter(&$form, $form_state, $form_id){
    if ($form_id == 'user_login' || $form_id == 'user_login_block') {
    $form['#redirect']=array('thepath/you/want.php');}
    }

    Now, let me explain how this works:
    • The first line tell you that you're hooking the hook_form_alter hook (sic). What does this means is that before any form is rendered this function is being called. Notice the three parameters, first one is the variable that hold the form, its an reference (& anyone?) so the changes you make to &form will exist outside this function. Dont worry too much about $form_state. The third one is the id of the form.
    • The second line is an if that we use to capture only the user_login page form (user_login) and the user_login block form.
    • If the form currently on form_alter is a login form, then we are going to modified it, giving the #redirect property the url that we want to go. If you need to pass parameters then use an array, the first one is the path, and the next ones are the parameters


This code should work for all the user login pages. But it will not work for user login blocks...

What the..

Yes, that code will not work for the login block of Drupal. Why? well because, redirect calls the function drupal_goto($url) an that function is going to ignore you if $_REQUEST['destination'] and/or $_REQUEST['edit']['destination'] exist. Why? I dont have a clue, maybe someone in Drupal wants us to be slapped in the face as a price for using this awesome piece of framework ( no sarcasm here, really!, i luuuuuuuuuve Drupal, well except the drupal_goto function).

The Solution
unset($_REQUEST['destination'], $_REQUEST['edit']['destination']);
Insert this after form redirect and youre ready to go!.

Dude, its not working
Well here are some hints if you need more help:
  1. Make sure you activate the module . Duh!
  2. Check that others noncore modules are not using drupal_goto. Drupal_goto is like a header('Location:....) , it will redirect you to another page, and if there is more code to process after calling drupal_goto, it would not be use.
  3. Clear your theme_cache. Even if you have the 'Rebuild the theme registry on every page load.' on, hell just clear all the cache just in case.
Maybe im missing something here but with this easy explanation i think i have covered all that is need to know for redirecting users at login state. Happy Hooking

Drupal Subtheming nightmare with a happy ending

Im modifying the user login form of a normal Drupal installation using the adaptative theme. so far so good, until i started to create some template suggestion files for my subtheme.

The tpl in question is named block-user.tpl.php. So i create my .tpl file and put all the needed stuff inside it. Then I put it in the template directory of my subtheme and .. it didnt work.

  • For now the file was in /sites/all/themes/adaptativetheme/subtheme/template/block-user.tpl

The second thing I did to make it work was copying that file on the template directory of the adaptative theme ( the father of my subtheme), and it works!. But why it didnt work on my subtheme?
  • The copied file was in /sites/all/themes/adaptativetheme/adaptative/template/block-user.tpl and also in:
  • /sites/all/themes/adaptativetheme/subthemename/template/block-user.tpl

The Fix
Apparently you have to had a copy of all the parent templates in your template directory. So the parent .tpl file of block-user.tpl.php is block.tpl.php. Its a bug in Drupal6, live with it because it wont be fixed. Why it works on the theme instead of the subtheme, because the Adaptative theme has that file by default. So I copy that file on my subtheme.. to no avail.

Clearing the Cache
I had the Rebuild the theme registry on every page load option on, so i wonder why it didnt work. I cleared all the cache ( Its an options that appears in the module Administration Menu, a must have module ), and Voila!, it worked in my subtheme!, so you must clear the cache when seeing funny stuff happening with your tpl files.

Optional Life Savier Info
Also they must be in the same directory as the parents of your subtheme. So if your main theme saves all our .tpl files in the templateyeah carpet, you need to create the same carpet in your subtheme.

Hope this little article help someone drupaling. Happy coding!

Aptana 3 Color schema sucks (and the remedy)

So you installed the new Aptana 3 beta, but suddenly all your code its invisible to your eyes, including the cursor, yes, the cursor is, for some unknow reason, invisible to a normal human being.

And that's the reason, you shouldn't smoke crack cocaine when devising the new color schema of Aptana.

But dont worry, after some googling i found how you can change this to a more acceptable color schema.

1) Open your Aptana an go to the menu Windows->Preferences


2) Change the eyeburning theme to any other theme, god ,any other theme will do it fine. Just select Aptana->Theme and you will see something like the photo below:


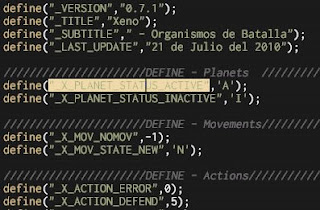
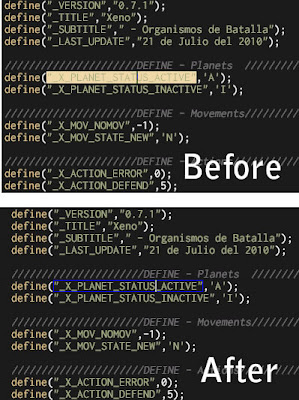
BONUS PACK: How about the variable highlight, it just messing up my retina!!!!. Well I finally found where is the option to change it so it will look like this:


Well today is your luck day. Just follow this guide:

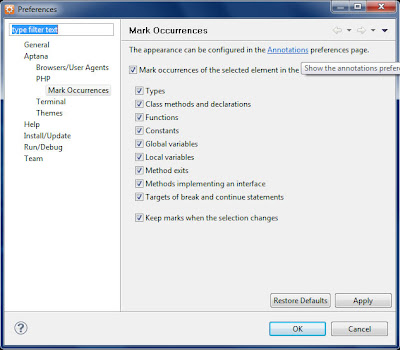
1) Go again to Windows->Preferences, and then navigate to Aptana ->PHP -> Mark Ocurrences . TIP: If you want to dissable it all, just uncheck all the options here and forget abot the rest.

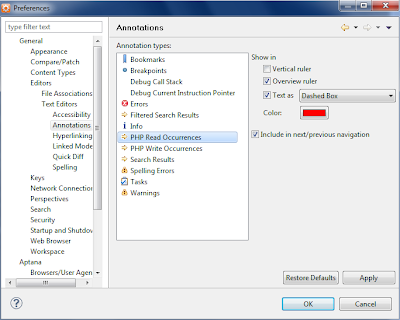
2) Do you see the link called annotation up there?, just click it and you will see the next windows:


3) Here you will have to modified two options PHP Read Ocurrences and PHP Write Ocurrences, does those name make sense to you? neither to me, but what the heck, Aptana rules but the color schema suck, but you can change it anyway so enjoy it.

IE6 and Ubertcart

There's a problem with Ubercart and any modules that use a great quantity of CSS files in Drupal. It doesnt seem to work in IE (any version).

Sympthoms
You install Ubercart or any other big module in Drupal. you test it and seems fine in all the browsers , except IE (again, any version). Seems like some CSS files are missing.


WTF happened to my CSS! yelling is another sympthom of this IE induced disease

Cause:
IE6 was created to support only 31 stylesheets if you use the link tag to insert them. So when you install ubercart, theres a big possibility that youre excedding that nonsense limit. Have a good day with that.

Remedy:
There are two ways to work this in Drupal without feelin like youre kicked in the nuts with an iron spiked shoe:
  • Im too young to die way (Easy Way): Just use unlimited css module, install it an forget about it. This module will call all the CSS files via an @import rule , you can have more thant 31 @import rules in IE, that why it work. Just as a side note, as a good web developer youre not supposed to use the @import rule because its mean trouble.
  • Hurt me plenty way (Medium Way): Activate the Css File Optimizer in Drupal. Go to admin/settings/performance and you will find the option Optimize the Css Files (duh!). This will mix all the css files in your web page to just one file. I couldnt make it work in my server, this option need a beefy machine to run so make sure you have a really reaaaaally fresh backup of your site before activating this.
You can also activate the Optimize the Javascript Code option, jsut remember to make a backup

So at least in Drupal there are ways to deal with it. Hey dont blame IE for teaching you about web server performance and making you lost 4 hours of your life yelling like a crazy schoolgirl before a Jonas Brothers concert.

Hate the Computers Gnomes, yeah thoses little rascals causing trouble again.


Change the Scayt language in Drupal CKEditor Module

This will be a short post about that dammed Spell Checker that comes active by default in the Ckeditor module of Drupal. Well as to this day the best WYSIWYG Module in Drupal 6 (for me) is Ckeditor. Its simple to install, fast as hell at least compared to Fckeditor, and easy to configure, except the SpellChecker plugin.

Yes Ckeditor has an SpellChecker, No its not easy to configure.

By Default the SpellChecker plugin is active, and in english, so i couldnt find a way to deactivate it but at least I found the way to change the language. Just search for the string 'en_US' in the file ckeditor.js and change it according to the idiom you want.For spanish is 'es_ES'. You will found this file in the real ckeditor directory , not in the module.

That file is a minimized version of ckeditor. You can found the source in '_source' directory, just in case you wonder what does the real ckeditor do.

Drupal Lightbox2 and Paging

So I had a strange problem with an ecommerce site Im developing. The site shows in the front page some products. The Owner told me to put a button with the magnifying glass over there, and when clicked, make it appear a modal box that shows more info of the product.

The Magnifying Glass in all it splendor

So hands at work, i use the lightbox2 and views module to make something like the owners command. The frontpage must show 8 products and if we have more, use a pager to navigate between products.

This is the pager, just in case youre asking what is a pager.

The problem? The view use paging so i show only the first eight products in the first page but if we go to the second page, problems occurs. The lightbox show all the modal boxes with the information of the first page. Oh god i smell some bug induced headache soon


The Solution
So after an entire day of debuging I found the problem: Lightbox2 is not taking in account the page you are when it retrieve the data. Basically lightbox2 use the load() function of jquery to get the WHOLE page it need to extract the info. The url of the page is inserted by lightbox2 usign the template in the file lightbox2_handler_field_lightbox2.inc

You have to change the line 124 like this:
Before:

// We don't actually use the link, but we need it there for lightbox to function.
if (empty($link)) {
// Get the path name.
$path = isset($_GET['q']) ? $_GET['q'] : '';
//Created By Carlos
}

After:

// We don't actually use the link, but we need it there for lightbox to function.
if (empty($link)) {
// Get the path name.
$path = isset($_GET['q']) ? $_GET['q'] : '';
//Created By Carlos
if(isset($_GET['page'])){
$path = $path .'?page='.$_GET['page'];
}
$link = url($path, array('absolute' => TRUE));
}


I just get the GET value of the current page and if it have a variable called page, append ?page= and the number of the page to the path that will be inserted in the lightbox trigger. Question anyone?

Adding new fields to the Ubercart Checkout module

So, you are using Ubercart and Drupal, but the checkout address fields isnt enough for you. Lets say, you need to add some more fields like a cellphone number or a district field. Well you have come to the right place, but before this, let me give you some advice.

Before the hack/slash
  • There is a module called Extra Fields, that give you the ability to input some extra fields to your checkout page. But you can't insert your fields to the billing and delivery panel. It just create a new panel to put that extra info. Maybe with some CSS and JS you can move the extrafields to the biling and/or delivery panel.
  • There is a webform to ubercart checkout module, its in beta stage, if you need more thant text boxes maybe this is the module you are looking for.

Into the Abyss
This tutorial is not for beginners, but with a little know of copy and paste you can do the magic. User with a cpanel hosting can use the file manager and phpmyadmin to easily modified the required files and tables.

Also remember that hacking your Drupal Files is not something that i recommend, but in some cases, its the only way to do things here. I didnt know too much about hooks in Drupal, but for what can i see in the code, i think it isnt possible for this Ubercart version to create hooks to modify the delivery and billing panels.

Step o : Requisites:
Obviously you will need to install
Ubercart 2.X with all the required modules. I used Drupal 6.15 for this tutorial, but I think it will work well with any Drupal 6 version.

Then, fill your Drupal+ Ubercart installation with some products and the info of your store. Make sure you install the checkout module of Ubercart.

Next step is creating a backup of your files and your database. You are not going to advance to the next step until you make your lifesaver backup. Seriously dont go ahead without your backup.

Also, before we going any further, theres something strange i need to explain first. The checkout panel contains two important panels, the delivery panel and the billing panel. Essencially those panels share the same fields, and, for some strange reason in ubercart, if you only need a field in one panel, you are going to create it in both panels and save that info in your database of both fields.You can hide one of them if you dont need it anyway.

In this example I'm going to create a new cellphone field for the billing and delivery address.

Step 1 : The database

First we need an identifier name for our new field. It should be a word in lower case. In my example I will just call it cellphone. Next thing is insert that variable in our database.
  1. Use any DB manager (here im using phpMyAdmin) to update the table called variable and search for the row with the name uc_address_fields. This row contain the list of all the variables used in the checkout panel. Dont be scare, the text here is just a serialized php array. Now add a line containing something like this: s:9:"cellphone";s:9:"cellphone" (sic) somewhere between two semicolons, just like my image. Notice that you are going to repeat twice your new field. And for the curious s:9 means [s]tring of nine spaces. cellphone is a word with 9 letters. Just look how the other fields are stored here.
s:9:"cellphone";s:9:"cellphone";

2. Add the fields billing_identifiername and delivery_identifiername. to the uc_orders table. In this example im going to create billing_cellphone and delivery_cellphone. Its doesn't matters if you are going to use only one of them, you will need to create both.

The new fields on the uc_orders table

And thats its for the database. The next step is modifiendo the uc_store.module file.

Step 2 : Playing with ubercart/uc_store/uc_store.module file
Here is where the copy&paste party begin:
  1. Search for the function uc_store_address_fields_form() that should be around the line 702. Now you see that big array? just add a field that identify your new field. I suggest using your identifiername for the array.

$fields = array(
'first_name' => array(t('First name'), TRUE),
'last_name' => array(t('Last name'), TRUE),
'phone' => array(t('Phone number'), TRUE),
'cellphone' => array(t('Cellphone number'), TRUE),
'company' => array(t('Company'), TRUE),
'street1' => array(t('Street address 1'), TRUE),
'street2' => array(t('Street address 2'), TRUE),
'city' => array(t('City'), TRUE),
'zone' => array(t('State/Province'), TRUE),
'country' => array(t('Country'), TRUE),
'postal_code' => array(t('Postal code'), TRUE),
'address' => array(t('Address'), FALSE),
'street' => array(t('Street address'), FALSE),
);

What is that t() function surrounding the text? It just a drupal functions that allow that text to be translated. Just
copy it as you see here.

2.- Now, next to that big array you just modified, there is a line under it,with a function called variable_get, it could be the line 728 but in any case it should be nearby. Add your identifier name inside single quotes as a parameter of the drupal_map_assoc function, like this:
$current = variable_get('uc_address_fields', drupal_map_assoc(array('first_name', 'last_name', 'phone', 'company', 'street1', 'street2', 'city', 'zone', 'postal_code', 'country','cellphone')));
3. Now go to the function uc_get_field_name that should be near the line 1177 and you will see another array. Just copy and item of the array and paste it and change it using your identifier name like this: 'cellphone' => t('Cellphone number'),

4.Next, go to the function uc_address_field_enabled near the line 1207 and you will find something like step two. Just add your identifier name as the last parameter of the drupal_map_assoc function.

5. This is the most important step on store.module, coz this is where you tell the database to obtain the address values. Go to the function uc_get_addresses near the line 1442 and you will see two database queries one for Mysql and the other one for Postgres. Modified the sql that you use, should be like this using the mysql select:

$result = db_query("SELECT DISTINCT ". $type ."_first_name AS first_name, "
. $type ."_last_name AS last_name, ". $type ."_phone AS phone, "
. $type ."_company AS company, ". $type ."_street1 AS street1, "
. $type ."_street2 AS street2, ". $type ."_city AS city, "
. $type ."_zone AS zone, ". $type ."_postal_code AS postal_code, "
. $type ."_country AS country, "
. $type ."_cellphone AS cellphone FROM {uc_orders} WHERE uid = %d "
."AND order_status IN ". uc_order_status_list('general', TRUE)
." ORDER BY created DESC", $uid);

6. Now lets get back to line 336, here we are going to copy and paste one of those lines below, copy it and change it. With the cellphone example it should be like this:
  $conf['i18n_variables'][] = 'uc_field_cellphone';  

Step 3 : Playing with ubercart/uc_order/uc_order_order_pane.inc
This is easiest. There are two modifications, one for the delivery and one for the billing:

1. For Delivery: Go to the function uc_order_pane_ship_to and you will see a switch case. Look for the 'edit_form' case in line 27, this is where you have to copy&paste one of the if, and make 4 changes. Heres an example of before (phone) and after (cellphone).

    Before:
if (uc_address_field_enabled('phone')) {
$form['ship_to']['delivery_phone'] = uc_textfield(uc_get_field_name('phone'), $arg1->delivery_phone, FALSE, NULL, 32, 16);
}
After:
if (uc_address_field_enabled('cellphone')) {
$form['ship_to']['delivery_cellphone'] = uc_textfield(uc_get_field_name('cellphone'), $arg1->delivery_cellphone, FALSE, NULL, 32, 16);
}
Once you have done this, you can modified the line 24 (the view case) if you want that the info fo your field appears in the Orders options of ubercart, the page where you see the data of your order as an admin. This is an example with the line 24 modified for cellphone

$output = uc_order_address($arg1, 'delivery') .'
'. check_plain($arg1->delivery_phone) .'
'. check_plain($arg1->delivery_cellphone);


2. For Billing, just repeat this step but look out in the line 122. if you want the billing data to show in your Order page, just modified the line 112 like in the delivery example.

Step 4 : Playing with ubercart/uc_order/uc_order.module file

1. (Optional) Add our field as a token. go to the line 407 inside the function uc_order_token_values. Here you should copy one of those lines, paste and modified it. Create one line for the billing and one for the delivery. In my example it should be like this (the red part is the new):

$values['order-shipping-phone'] = check_plain($order->delivery_phone);
$values['order-shipping-cellphone'] = check_plain($order->delivery_cellphone);
$values['order-billing-cellphone'] = check_plain($order->billing_cellphone);
$values['order-shipping-method'] = is_null($ship_method) ? t('Standard delivery') : $ship_method;


2. (Optional) Give a description of that token. Go to the function uc_order_token_list, near line 441 copy an paste one of those lines. Heres an example for the billing an delivery description:

$tokens['order']['order-shipping-cellphone'] = t('The cellphone number for the shipping address.');
$tokens['order']['order-billing-address'] = t('The order billing address.');
$tokens['order']['order-billing-phone'] = t('The phone number for the billing address.');
$tokens['order']['order-billing-cellphone'] = t('The cellphone number for the billing address.');


3.The code that save your field in the db. Go to the function uc_order_new near line 1013 and search inside it for an sql with the insert command. Modified it so it insert data into the rows create in step1. Remenber one for the delivery and one for the billing field. The sql would look like ( the ... is a resume, dont take it literally!!!)

db_query("INSERT INTO {uc_orders} (..., created, modified,billing_cellphone,delivery_cellphone) VALUES " ."(..., %d, '', '')",

4. The code that update your field in the db. go to the function uc_order_save near the line 1046 and look for the sql that update your data. Modified it so it update your field.

Step 5 : Playing with ubercart/uc_cart/uc_cart_checkout_pane.inc file
1. Modifing the checkout_pane_delivery hook. This hook is called to interact in the checkout module of Ubercart. Go to the function uc_checkout_pane_delivery near the line 224, copy and paste one of those if statement inside it and modified it according to your identifier word, like this:

if (uc_address_field_enabled('cellphone')) {
$contents['delivery_cellphone'] = uc_textfield(uc_get_field_name('cellphone'), $arg1->delivery_cellphone,uc_address_field_required('cellphone'), NULL, 32, 16);
}


2. Go to the case 'process' near line 292 and copy and paste one of those $arg1, modified it accordly:
$arg1->delivery_phone = $arg2['delivery_phone'];
$arg1->delivery_cellphone = $arg2['delivery_cellphone'];


3. Reviewing your field (optional). Go to the case 'review' near line 293. This line is called to review the data of your field when a client make an order.I just copy and paste some text there but maybe you would need some more exotic validations here.

if (uc_address_field_enabled('cellphone') && !empty($arg1->delivery_cellphone)) {
$review[] = array('title' => t('Cellphone'), 'data' => check_plain($arg1->delivery_cellphone));
}

4,5,6 This is the same as 1,2,3 but is for the billing panel. Go to the function uc_checkout_pane_billing in line 371 and modified it if you wish to have an field in the billing pane.

NOTE: you can choose here to do only a field in the delvery or the billing panel, or maybe both. Just follow instruction 1,2,3 for the delivery panel and/or 4,5,6 for the billing panel.


Step 6 : Some js in ubercart/uc_cart/cart.js file
Have you seen that checkbox that copy the billing field to the delivery field? Well you can modified it if you want to copy your new billing_field into your delivery_field. Go to the line 129 and see some repetitive code of the fields. Heres the code i create for copying my new cellphone field.

$('#edit-panes-' + temp + '-phone').val(address.phone).trigger('change');
$('#edit-panes-' + temp + '-cellphone').val(address.cellphone).trigger('change');
$('#edit-panes-' + temp + '-company').val(address.company).trigger('change');


Thats it folks, its not easy but with this we are covering all the step to create a new checkout field in ubertcart. Enjoy