Double Border Stuff - Playing with CSS

Yesterday i was in a hurry to create some fast CSS, so a copy&paste frenzy just came in, and i discovered a maybe usefull way for putting double border. Lets look at it more carefully:

Imagine you have a div:


Hi Im unique


Now lets put some css to make it pretty


div#Unique{
background:#0033CC;
border:10px outset #ccc;
color:white;
}


Ok, maybe not sooo pretty,anyway we will have something like this:

Hi Im unique


What if we put some more border options in here, something like:


div#Unique{
background:#0033CC;
border:10px outset #ccc
border-top:15px double outset #ccc;
border-bottom:15px double #ccc;
color:white;
}


Walla!!!. Our DIV get a makeover and finish like this:

Hi Im hell more unique :P


Notice that here this:


div#Unique{
border:red;
}

is equal to say:


div#Unique{
border-left:red;
border-right:red;
border-top:red;
border-bottom:red;
}


So is nothing new but you can create a beatifull effect using only pure CSS.

Better yet i was testing it and its seems like it work on Firefox 3, Opera 9.5 and believe it or not in IE 6.0!!!. That just some kick-ass CSS!!!. Well not really but it may be helfull. See ya next deculture ^^

How to create a Tag Cloud in Blogger

In my quest for a decent tag cloud system for my other blog, i have found this

The Tag Cloud for Blogger create in this page/blog: phydeaux3

I have just tested it in my other blog and it just works!!!. I higli recommend it.

1 Crazy Way to use json - json precharge

So youre a web developer doing some boring stuff with forms, lets put us in this scenario: You have a Typical Web Form generated with PHP. Also in the form you have some mighty select boxes called State and City, so every time you change the State, the City select box change. So What?, you will say,that stuff is ajax for sure. But what happens with the inital load of info, i mean how do you fill the select boxes the first time you access the page?

The Form in all his splendor


Well there where three options... until now ;)

A) Old School Server Madness: Yeah the standard to choose... in 2001. In this scenario the form is created with PHP, and when the selectbox of State change, you send a new almost identical page via GET or POST method with a fresh refill of Cities according to the state you send. This was the old way and i still see that methood going around in some pages. So why not use that?

Well fisrt is slow as hell and well.. AJAX anyone?, but the biggest reason why you should'nt work like that is because the server dont know if what you try to do when you send the POST/GET is getting new cities or sending the complete form filled, so you play with unnecesary hidden variables or check that all the fields are not empty,well just more work for such a simple thing

B)Server Precharge the Data,and Ajax afterward: This scenario is now the standard way to solve this problem, but not the brigthess. Here you fill the first round of cities with PHP and when the select box change, you do it via AJAX, so you send the petition, the server create the city DOM (i mean the options tags with duh.. the options), and then Mr Javascript take charge and put the DOM into the selectbox. So what's wrong with this way? Well nothing is wrong but it can be better.Think again little grasshoper, why build the DOM from the server when you can build it on the client.Imagine if you free the server for all the charge of creating DOM, say goodbye to loops and whiles and if statements. If you know what MVC means this can a way to make things better. So why not send the data in a naked stance to the client and let them write his DOM. Well, let me introduce C guy.

C)Ajax Semigod takes the (pre)charge: This is like the next step, like going from an ATARI 2600, to a BlueGene that kick Gasparov Ass. In this scenario (lots of scenarios in my blog) you send the form empty, and you use javascript to create the DOM based on naked data send from the server using eiher XML that is slow, or using json, that is fast. So json it is. Now when the page finish to load the first time, all the select boxes are empty,so you use ajax to fill them. Well here you get a bonus over the other methods, you put some of the work of the server into the clients (da browsers). So the Server just have to send Data in json, in PHP you do something like this:


< ?php echo json_encode($array_of_cities) ?>

and that's it, you get a jsonized var that you can send to the client.He will do the rest. But wait, isnt this alot of unnecesary calls to the server? I mean that can be done faster if the server draw the first selects boxes and when we need a fresh supplies of cities we ajax it until fullfitness?. Yes but you are creating a new deja vu here, the client and the server are doing the same thing. So was wondering a few days ago a better way todo it, so here it is the:

D)Json Precharge Overdose: Well i guess there are alots of smartguys that have discover this method but , i never see any reference to this so here it is. Its a fusion from B and C.
The first load of the form, you send the page selectboxes unfilled but you also print the PHP cities data (naked data), and make it a global variable in javascript. How ydo you do that?

Well in PHP you do something like this:

< ?php echo "var naked_data= eval('$array_of_cities') "?>
And then when the page load, you create with javascript the options DOM for the city select box using the global variable printed with PHP. The next time you call for fresh data, you just ask for the same fucntion that get you the json and recreate the selectbox DOM again using javascript. If you think in a MVC way, you are just effectively separating the view from the controller. So now you free the server forever of building the page DOM and you dont get unnecesary AJAX call to the server. But this method does have some problems:

  1. The fact that youre using globals variablesin javascript can make your life a living hell in large projects. But not so if you use a javascript framework like jquery, or use object in javascript, so if you have some order in your code, this can help alot.
  2. Using PHP to print javascript code, thats not good, but remember that youre not creating all the javascript in the page. You re just sending data from the server to the client. so the client can work with it.
So next post in my blog wil be putting this topractice usign jquery and php, stay tune

What is & Why Social Bookmarking

Lets say you have you Blog ready to be launch and be read by a lot of people, but nobody comes, so what do you do?

Well you can tell your friends about your "wonderfull" blog, then you have now 10 people, well let's say 20 people (youre a very friendly guy, dont you?) that knows about your blog, well thats just not enough, maybe you will spread the notice in all the contacts of your mail, until you get busted for spammer or maybe you think its a good idead to go on rampage in to the first chat room that you find googling, but guess what, nobody in that chat room give a dimme for your blog.

This same question arise again and again in your head,asking yourself what should i do to bring more people to my blog/webpage?, well, there an answer, welcome to the world of Social Bookmarking.

Now, in this so called is social bizarre bookmarking world, you are read by strangers that seek information that can have some relation with your blog. How does those strangers now your blog have something related to what they are searching?, because of the tags, little words that describe what is the subject of your blog. For example this Post have the social bookmarking tag, so anyone looking for social bookmarking could find this post and all because of the migthy tags

So, that doesn't resolve our predicament, or maybe yes (please, imagine Mr burns laughing hard),if that random dude, find the post useful ( or funny, hot, cool, whatever) he will feel the need to share it to the world, ergo, he socialbookmark it, which means that he will post your blog in a page that shares the dude's personal bookmarks to the world. And as a plus, people can find your blog by the tags assgined toyour post.

So anyone seeing that repository has a chance to see your post and visit it, and if he too find your post worth for some socialbookmarking, well tomake things shorter, you can become very famous, (and maybe your webpage will go down by the excesive amount of visitors, yup that happens a lot).

Well actually some guys say that maybe those readers are not quality readers, well for starters i think any publicity is good, but keep in mind that socialbookmarking is a sword of double edge

Well look at this video, it explain alot better than me, what socialbookmarking is


Happy deculture ^^

Syntax Highlighter on Blogger - Color Madness

So, youre a uberbloggerweb designer in a mission to create the perfect css and now you want to share it in your blog so you can make your ego feel good. But oh surprise! you want your code to look better that this mess:

#header #header-menu ul li {
color:#FFFFFF;
float:left;
font-family:Verdana;
font-size:11px;
font-size-adjust:none;
font-stretch:normal;
font-style:normal;
font-variant:normal;
font-weight:bold;
height:22px;
line-height:22px;
margin-right:6px;
}

#header #header-menu ul {
list-style-type:none;
}

maybe a little more like this (heaven incarnate css):
#header #header-menu ul li{
color:#FFFFFF;
float:left;
font-family:Verdana;
font-size:11px;
font-size-adjust:none;
font-stretch:normal;
font-style:normal;
font-variant:normal;
font-weight:bold;
height:22px;
line-height:22px;
margin-right:6px;
}

#header #header-menu ul {
list-style-type:none;
}
How do you do that? , Well wonder no more my egomaniac developer cuz im bringing ya... FaziBear Blogger Syntax Highlighter!

Step1: Go to Fazibear gadget page and:

(1) Click here and (2)Click there (oh god this is so easy).

Step2: Create a new Post, put your code-to-be-colored on, go to Edit HTML,and surround your code like this:


Yes, it is an image, and yes you have to type it, you lazy developer

you can choose different flavors (replace c-sharp with the alias of your choice):

Language Aliases
C++ cpp, c, c++
C# c#, c-sharp, csharp
CSS css
Delphi delphi, pascal
Java java
Java Script js, jscript, javascript
PHP php
Python py, python
Ruby rb, ruby, rails, ror
Sql sql
VB vb, vb.net
XML/HTML xml, html, xhtml, xslt

more easy, impossible, just remember that this gagdet is only for Blogs on Blogger.

Say thanks to the maker of this gagdet, the great Fuzzyb.. i mean FazyBear
He created the gagdet based on this Library. This library is all in javascript so you can use it if you use Wordpress. But i wont tell you how to do it on Wordpress ;)

See ya next deculture

TwitterTalk -Make your own Twitter Avatar

What the heck is this gagdet?
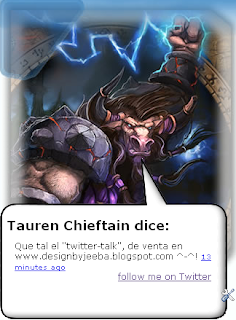
Basically we put the last message of our twitter account into a talkballlon like a comic. We can put it in an image and make it "talk". Here, look at this example on my experimental blog TaurenCreate


Now see the badass tauren become alive with all your nonsense. Happy now?, No?, well Im sure Mr Tauren is happy now.

[Awesome Dude]||[I hate you, you Tauren lover], so, How do i do it?

Well you will need some frigging knowledge in CSS and tweak some stuff inside your blog HTML, that's it, now lets do it baby

Step 0: Create a Twitter Account an log in, well this is kinda obvious, so do it now if you dont want to feel bad for not having one acount already ^^.

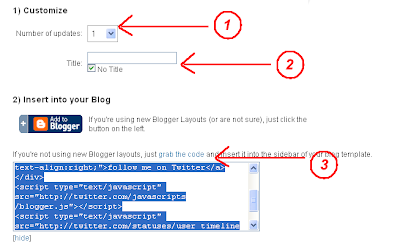
Step 1: Go to http://twitter.com/badges/blogger and do like this:

1) Select only one update, bitchslap u for thinking different than me
2)Select no Title and enjoy
3)Make a click in grab the code and copy it, now comes the funny part

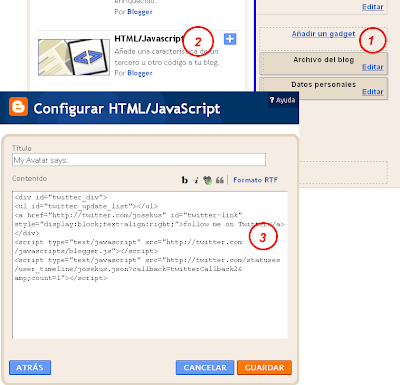
Step 2: Go to Design->Page Element and...


1) Add a New Gagdet
2) Select HTML/Javascript
3) Paste the code and save it.
4) BE happy, we almost finish

Step 3: now the not so funny part, go to Design->HTML Edit and..
a) Save your template for the love of god
b) Put this CSS whenever you feel comfortable (maybe after the body tag, just maybe)


/* Main - talkbox */
#twitter_div{
width:270px;
padding:10px;
list-style-type:none;
}

#talkbar {
width: 312px;
font: normal 12px Verdana;
color: #ffffff;
margin: 180px 0 20px 0;
}

#talkbar-top {
background: url(http://lh3.ggpht.com/designbyjeeba/SPDRDpyk6hI/AAAAAAAAAP4/SekxCACvl9U/talbox-top.png) no-repeat;
padding-top:16px;
}

#talkbar-bottom {
background: url("http://lh3.ggpht.com/designbyjeeba/SPDgJvWkl6I/AAAAAAAAAQE/6NJp7-S9TCA/talbox-bottom.png") no-repeat left bottom;
padding-bottom:22px;
}
#talkbox1 {
padding-left:10px;
width: 312px;
font: normal 12px Verdana;
color: #ffffff;
background:white;
background: url("http://lh4.ggpht.com/designbyjeeba/SPDRCwiw2YI/AAAAAAAAAPo/fW0GsA55cGg/talbox.png") repeat-y;
color:black;
margin-top:65px;
}


c)Now search for the widget tag that contains the HTML code you just insert in Step2, and put it between this code (in this example the red part is the widget tag code you just create).


d) Now comes the tricky CSS part that i have been warning you about, you have to paste the code of (c) into your blog HTML. Paste it near the position of your avatar image (maybe inside of the sidebar or inside a new div,the choice is yours) and modify my CSS at pleasure. This kind of talk-ballon should be put as a float or inside a floated tag. Using firebug can help a lot in the process.

And its done, hug yourself for making this gadget work. Well dont forget to digg me if you like this