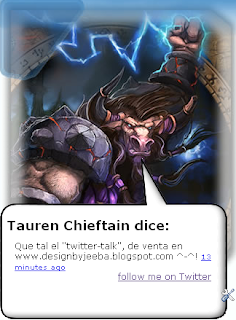
Basically we put the last message of our twitter account into a talkballlon like a comic. We can put it in an image and make it "talk". Here, look at this example on my experimental blog TaurenCreate

Now see the badass tauren become alive with all your nonsense. Happy now?, No?, well Im sure Mr Tauren is happy now.
[Awesome Dude]||[I hate you, you Tauren lover], so, How do i do it?
Well you will need some frigging knowledge in CSS and tweak some stuff inside your blog HTML, that's it, now lets do it baby
Step 0: Create a Twitter Account an log in, well this is kinda obvious, so do it now if you dont want to feel bad for not having one acount already ^^.
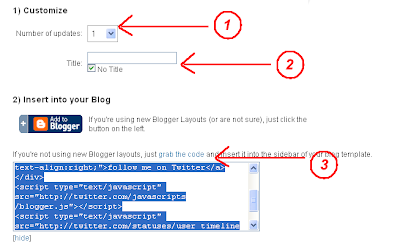
Step 1: Go to http://twitter.com/badges/blogger and do like this:
 1) Select only one update, bitchslap u for thinking different than me
2)Select no Title and enjoy
3)Make a click in grab the code and copy it, now comes the funny part
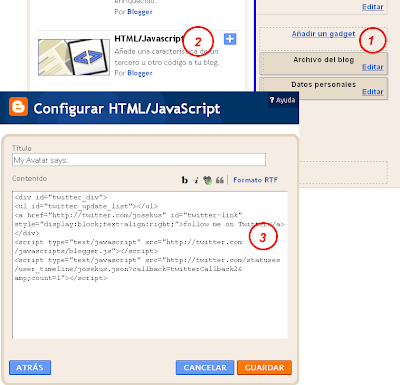
Step 2: Go to Design->Page Element and...

1) Add a New Gagdet
2) Select HTML/Javascript
3) Paste the code and save it.
4) BE happy, we almost finish
Step 3: now the not so funny part, go to Design->HTML Edit and..
a) Save your template for the love of god
b) Put this CSS whenever you feel comfortable (maybe after the body tag, just maybe)
  /* Main - talkbox */
  #twitter_div{
     width:270px;
     padding:10px;
     list-style-type:none;
  }

   #talkbar {
   width: 312px;
   font: normal 12px Verdana;
   color: #ffffff;
   margin: 180px 0 20px 0;
}

#talkbar-top {
   background: url(http://lh3.ggpht.com/designbyjeeba/SPDRDpyk6hI/AAAAAAAAAP4/SekxCACvl9U/talbox-top.png) no-repeat;
           padding-top:16px;
}

#talkbar-bottom {
   background: url("http://lh3.ggpht.com/designbyjeeba/SPDgJvWkl6I/AAAAAAAAAQE/6NJp7-S9TCA/talbox-bottom.png") no-repeat left bottom;
           padding-bottom:22px;
}
   #talkbox1 {
           padding-left:10px;
           width: 312px;
   font: normal 12px Verdana;
   color: #ffffff;
           background:white;
           background: url("http://lh4.ggpht.com/designbyjeeba/SPDRCwiw2YI/AAAAAAAAAPo/fW0GsA55cGg/talbox.png") repeat-y;
           color:black;
           margin-top:65px;
   }
c)Now search for the widget tag that contains the HTML code you just insert in Step2, and put it between this code (in this example the red part is the widget tag code you just create).
d) Now comes the tricky CSS part that i have been warning you about, you have to paste the code of (c) into your blog HTML. Paste it near the position of your avatar image (maybe inside of the sidebar or inside a new div,the choice is yours) and modify my CSS at pleasure. This kind of talk-ballon should be put as a float or inside a floated tag. Using firebug can help a lot in the process.
And its done, hug yourself for making this gadget work. Well dont forget to digg me if you like this

No comments:
Post a Comment